
Moisture meter readings are relative, not absolute. A pin meter measures resistance between two probes; a pinless meter scans below the surface without marking it. One reading alone means little. What matters is comparison: a spot well above a dry patch nearby, and how the reading shifts as you move across the wall. That pattern points back to the source.
In This Guide
What moisture meter readings actually measure
Moisture meter readings tell you how much moisture is present in a material relative to a dry baseline, not an exact percentage of water you can act on by itself. The device gives you a number on a screen, usually with a scale from green through amber to red. Homeowners often treat that number the way they’d treat a thermometer reading: a fixed fact about the world. It isn’t. A moisture meter is a comparison tool. It tells you that one spot holds more moisture than another, and roughly by how much, but it can’t tell you on its own whether that difference means a slow plaster cure, background condensation, or a pipe leaking behind the wall.
We use moisture meters every week as part of a wider damp diagnosis, never as the whole answer. The reading opens the investigation. It doesn’t close it.
Most meters on the market work on one of two principles: electrical resistance or electrical impedance (sometimes called capacitance). Resistance meters pass a small current between two points and measure how easily it travels, since damp material conducts electricity more readily than dry material. Impedance meters generate an electromagnetic field and measure how the material affects it, without needing direct contact at two points. Both give a relative reading. Neither tells you the cause.
Pin versus pinless meters
The two main types you’ll encounter, whether you buy a cheap meter online or watch a surveyor use one, are pin meters and pinless meters. They work differently and suit different jobs.
Pin meters
A pin meter has two small metal probes that you press into the surface of the material. It measures resistance between those two points, and the reading reflects the moisture content roughly between the pins. Pin meters are good for spot-checking timber, skirting boards, or plasterboard where a small mark from the probes doesn’t matter. They read at a fairly shallow, localised depth, which is useful when you want to know the condition of the material right at the surface rather than deeper in the wall.
The trade-off is that pin meters leave two tiny puncture marks and only sample the exact spot between the probes. Move the pins an inch and you can get a different number. That’s not the meter malfunctioning. It’s the nature of point sampling.
Pinless meters
A pinless meter sits flat against the wall or floor and scans a wider area beneath the surface using electromagnetic waves, without marking the material at all. This makes it the better choice for plaster, painted surfaces, or anywhere you can’t justify leaving pinholes, and it’s why pinless meters are the standard tool for a first pass across a room. You can scan a whole wall quickly, comparing readings as you go, before deciding where a more detailed check is worth doing.
Pinless readings go deeper into the material than pin readings, which is useful for finding trapped moisture that hasn’t reached the surface yet. The trade-off is that a pinless meter can’t isolate exactly which layer the moisture sits in. It tells you there’s more moisture in this zone than that one. It doesn’t tell you if that moisture sits behind the plaster skim, in the blockwork, or further back still.
Pin meters: best for
- Timber, skirting, and joinery checks
- Confirming a precise, shallow spot reading
- Situations where small probe marks don’t matter
Pinless meters: best for
- Scanning plaster, paintwork, and large wall areas
- A non-marking first pass across a room
- Picking up moisture sitting deeper in the material
Why a meter reading is only the starting point
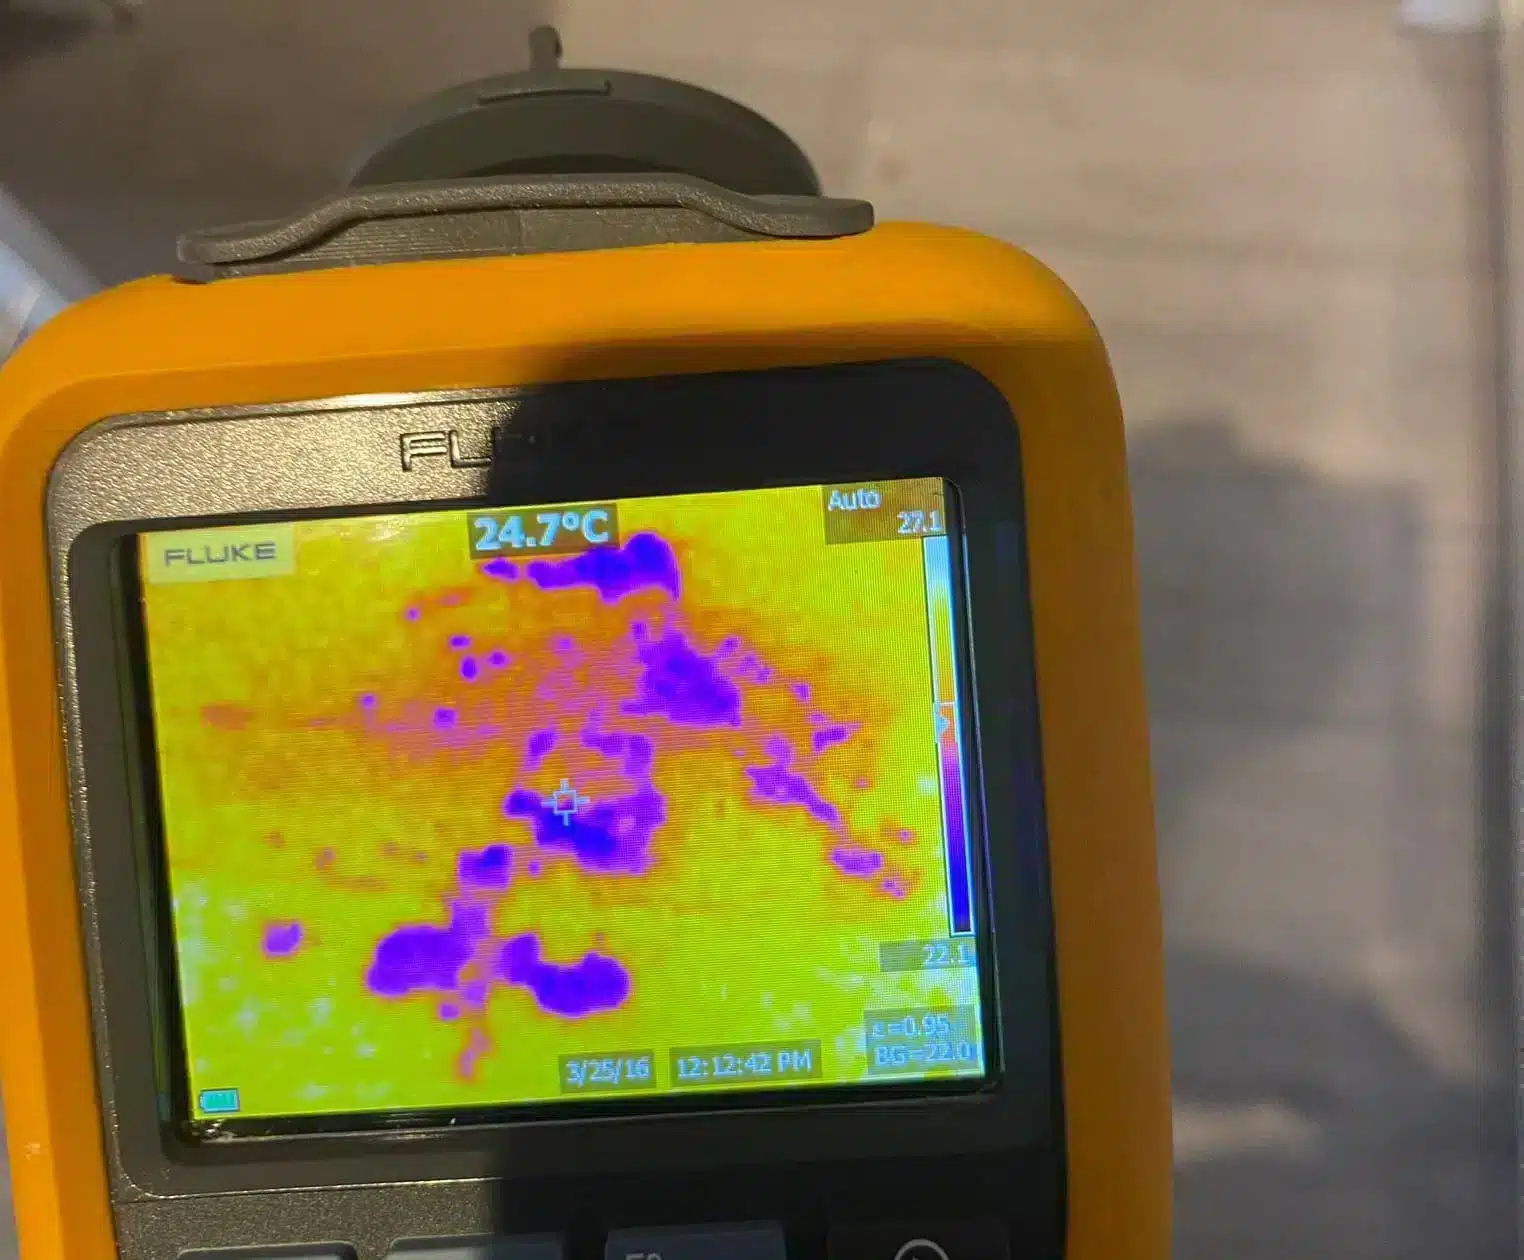
A moisture meter tells you where to look closer. A thermal imaging leak detection survey then shows the wider pattern behind the wall, revealing temperature differences that often line up with a wet patch long before it reaches the surface. We pair the two routinely: the meter confirms moisture is present, the camera shows how far it spreads and which direction it’s travelling from.
Why readings are relative, not absolute
Building materials vary enormously in how much moisture they naturally hold, even when perfectly dry. Old lime plaster behaves differently to modern gypsum. Granite and sandstone, common across older Scottish housing stock, hold and release moisture differently to modern brick and block. A reading of a given number on a meter’s scale can be entirely normal in one material and a clear warning sign in another.
This is why manufacturers calibrate meters against reference scales for specific material types, and why a competent surveyor never reads a number in isolation. What matters is the relationship between readings taken in the same material, in the same conditions, at the same time. A reading is only meaningful next to another reading you can trust as a baseline.
Ambient conditions shift the picture too. A wall reads differently in a cold snap than during a warm spell, and freshly applied paint or plaster can hold construction moisture for months without any leak involved. Anyone judging a single number against a fixed threshold, without checking what’s normal for that material in that room, is guessing.
Why one reading proves very little
A single reading, taken at one point, tells you almost nothing you can rely on. It confirms that moisture is present at that exact spot, at that exact moment. That’s all. It doesn’t tell you whether the moisture is rising, falling, spreading, or staying put. It doesn’t tell you where the moisture came from. And it doesn’t rule out condensation, a spill, a delivery of damp material, or simple seasonal variation as the explanation.
We see homeowners get one high reading near a skirting board and assume the worst; a burst pipe, a major leak, expensive repairs ahead. Sometimes that’s right. Just as often the reading reflects rising damp in an old solid wall, a blocked gutter splashing the same spot every time it rains, or nothing more than a cold external wall attracting condensation. The number is identical in each case. The explanation is not.
What actually distinguishes these causes is comparison: how that reading sits against the surrounding area, and how it changes as you move the meter further from the point. A single figure can’t show you that. A pattern of figures can.
If a reading is much higher than an equivalent, unaffected part of the same wall or floor, treat it as a signal to investigate further, not as a diagnosis on its own. Don’t start opening up plaster or lifting floorboards based on one number without checking the surrounding pattern first.
Mapping moisture gradients across a wall or floor
Professional damp diagnosis works by building a picture, not by chasing a single figure. The process is straightforward in principle, though it takes a trained eye to read correctly.
1. Establish a dry baseline
Take a reading somewhere in the same room, in the same material, that has no reason to be affected. This becomes the comparison point for everything else.
2. Take readings at a grid of points
Working outward from the area of concern, readings are taken at regular intervals, horizontally and vertically, across the wall or floor.
3. Plot how the numbers change with distance
Rather than looking at any one figure, the readings are compared against each other to see how moisture content rises and falls as you move away from the suspected source.
4. Cross-check with a second method
Thermal imaging or a closer physical inspection confirms whether the pattern the meter suggests matches what’s actually happening behind the surface.
This grid approach turns a set of disconnected numbers into a map. And a map, unlike a single reading, tells you something about direction and origin.
What the shape of a gradient tells you
Once you have readings across an area, the shape of the pattern matters more than any individual number.
Readings that fall off gradually the further you move from a high point tend to suggest a broad, diffuse cause, rising damp spreading upward from ground level, or general humidity affecting a whole external wall. The moisture has had time to spread evenly through the material, so the gradient is smooth.
A sharp cutoff, where readings drop quickly over a short distance, points toward a localised, active source close by, a pipe joint, a small crack, or a specific point of entry rather than a general condition. Water finds the shortest path it can, and a sharp gradient usually means it hasn’t had the chance, or the time, to travel far from where it entered.
Readings that stay high across a wide area with no clear taper at all often mean the source sits behind the whole section being tested, not at any single point within it. This is the pattern that most often justifies bringing in a proper water leak detection service rather than continuing to test point by point, since the source may be a metre or more away from where the damp actually shows.
| Gradient pattern | What it typically suggests |
|---|---|
| Gradual, even taper over a wide area | Broad or long-standing moisture, such as rising damp or general humidity |
| Sharp cutoff over a short distance | A localised, active source close to the highest reading |
| Uniformly high with no clear taper | A source likely hidden further back or behind the tested section |
Why professionals go beyond the meter
A moisture meter is one instrument in a wider process. It’s quick, it’s non-destructive when used correctly, and it’s genuinely useful for narrowing down where to look. But it can’t see through a wall, and it can’t distinguish between causes that produce a similar reading.
That’s why a thorough survey pairs meter readings with other evidence: a thermal imaging leak detection camera to see the extent and shape of a cold or wet patch behind the surface, acoustic listening equipment where a pressurised pipe is suspected, and a straightforward visual inspection of pipework, guttering, and known problem areas. Honestly, most of the time the meter tells us where to point the camera next, rather than settling the question by itself.
Our surveys are non-invasive wherever possible, and every finding is set out in a report suitable for an insurer, so a homeowner isn’t left with a number on a screen and no explanation of what it means.
Not sure what your moisture meter readings mean?
A number on a screen is only useful once someone reads it against the wider picture. We map moisture gradients and confirm the source with thermal imaging, so you get a proper answer.
Making sense of a reading you’ve taken yourself
If you own a basic moisture meter and want to check a suspect patch before calling anyone, a few habits make the reading more useful.
- Always test a known-dry reference point first. Without a baseline in the same material, a number tells you nothing.
- Test in a grid, not a single spot. Move outward in several directions and note how the readings change.
- Repeat at a different time of day. Condensation-driven readings often shift with temperature; a leak-driven reading tends to stay more consistent.
- Check the material setting on the meter. Many meters have different scales for wood, drywall, and masonry, and using the wrong one skews the number.
- Treat a high reading as a reason to look further, not a finished diagnosis. The pattern around it tells the real story.
None of this replaces a proper survey where the pattern is unclear or the affected area keeps growing. But it does mean you’ll have a more useful set of readings to describe when you do call someone in.
Frequently Asked Questions
There’s no single normal number, because readings depend on the material, its age, and the meter type. What matters is comparing a suspect area against a known-dry area of the same material nearby. A reading well above that baseline is worth investigating further; a reading close to it usually isn’t a concern.
Pin meters suit timber and skirting checks where small probe marks don’t matter and you want a precise, shallow reading. Pinless meters suit plaster and painted walls where you can’t leave marks, and they’re better for a quick first scan across a larger area before narrowing in.
A moisture meter confirms that moisture is present and roughly how it’s distributed across an area. It can’t confirm the cause on its own. Condensation, rising damp, and an active leak can all produce a similarly high reading, which is why the pattern of readings and other checks matter more than any single number.
Small variations are normal, since surface texture, temperature, and exactly where the probes or sensor sit can all shift the number slightly. Larger swings usually mean the material itself varies at that point, or conditions changed between tests. Consistent, repeated testing at a grid of points gives a far more reliable picture than one reading taken twice.
By comparing moisture readings across a grid to see how the pattern changes with distance, then confirming with thermal imaging or acoustic equipment. Damp often travels before it shows on the surface, so the visible wet patch and the actual source are frequently in different places entirely.
No. A high reading is a reason to investigate, not an instruction to start cutting into plaster. Non-invasive methods such as thermal imaging can often narrow down the source first, so any opening-up that follows is targeted rather than exploratory.
Yes, and this is one of the most common mix-ups we see. Condensation tends to affect a broader area and shift with temperature and ventilation, while a leak tends to produce a more consistent, localised pattern that doesn’t change much with the weather. Comparing readings over time and across an area helps tell them apart.
📍 Professional Leak Detection Across Scotland
Get a proper answer, backed by evidence
Don’t let a small problem become a big one. We combine moisture mapping with thermal imaging for a non-invasive survey and an insurance-approved report, with same-day capability across Scotland.